

You can rhinestone a dance costume at home in five steps: choose the right stone and adhesive, plan your design layout, apply each stone with precision, let it cure fully, and secure the stones for performance wear. Whether you are preparing for a national competition or a local recital, learning how to rhinestone a dance costume saves money and gives you total control over the final look.
Key Takeaways
- Flat-back rhinestones with hotfix or glue-on application work best for dance costumes, and crystal or AB finishes deliver the most stage sparkle.
- A well-planned design layout prevents wasted stones and uneven spacing — always map your pattern before applying adhesive.
- The average competition costume needs between 300 and 1,200 rhinestones depending on coverage, size, and design complexity.
- Full cure time for E6000 or GemTac adhesive is 24 to 72 hours — rushing this step causes stones to fall off mid-performance.
- Reinforcing high-stress areas like necklines, armholes, and waist seams with extra adhesive or stitching ensures stones stay through multiple routines.
Choosing the Right Rhinestones for Dance Costumes
Not all rhinestones perform the same way on a dance costume. The best rhinestones for dance costumes are flat-back, precision-cut, and made from glass or high-grade acrylic. Swarovski (now CRYSTALLIZED) remains the industry standard for competition costumes because of its consistent facet cut and light refraction. Preciosa and Czech glass stones offer comparable quality at a slightly lower price point.
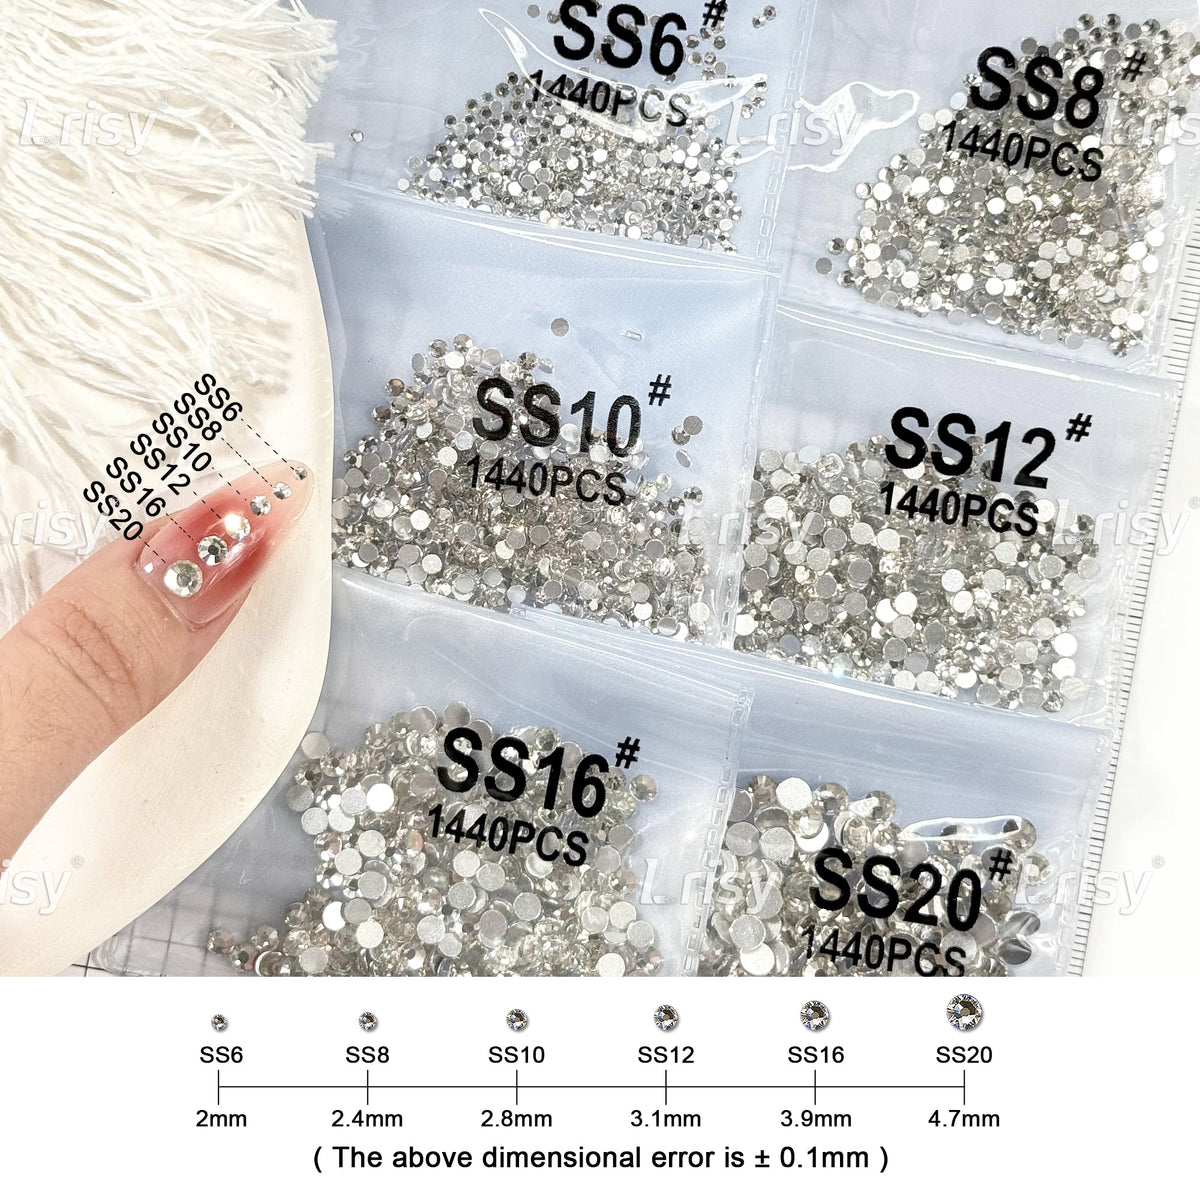
Size matters for both visibility and durability. SS16 and SS20 stones are the most popular choices for dance costumes — they are large enough to catch stage light but small enough to follow curved seams and intricate patterns. SS12 works well for detail work on bodices and sleeves. SS30 and larger stones make excellent statement accents along necklines and hemlines.
Finish also affects performance impact. Crystal clear provides the brightest sparkle under white stage light. Aurora Borealis (AB) adds a rainbow refraction that reads well under colored gels. Light Colorado Topaz and Smoked Topaz complement warm costume tones without washing out.
Avoid plastic or resin stones for competition costumes. They lack the refractive index to sparkle on stage, and they can melt or discolor under hot stage lights. The small upfront savings are not worth a dull performance.
How Many Rhinestones Do You Need for a Dance Costume?
The number of rhinestones required depends on coverage density, stone size, and the surface area of the garment. A standard child-sized competition bodice with medium coverage (50-60% of the surface) requires 400 to 600 SS16 stones. An adult full-coverage costume with dense application needs 800 to 1,200 stones.
Here is a practical breakdown by costume type:
- Child soloist bodice, medium coverage (SS16): 400-500 stones.
- Adult soloist bodice, full coverage (SS16/SS20 mix): 800-1,200 stones.
- Skirt or hem trim accent (SS16, single row): 100-200 stones per yard.
- Sleeve accents (SS12, scattered): 150-250 stones per sleeve.
- Full leotard or catsuit coverage: 1,500-2,500 stones.
Always buy 10-15% extra for replacements and mid-project adjustments. Running out of stones mid-way forces you to match dye lots, which is nearly impossible with crystal finishes.
Tools and Materials You Will Need
Gather everything before you start. Stopping mid-project to find supplies breaks your workflow and increases the chance of mistakes.
Adhesives:
- E6000: Industrial-strength, flexible bond. The gold standard for dance costumes. Requires 24-72 hour full cure. Works on fabric, lycra, chiffon, and mesh.
- GemTac: Designed specifically for rhinestones on fabric. Dries clear, remains flexible, and washes better than E6000. Cure time is similar.
- Hotfix wand or iron-on stones: Faster application but less secure for high-motion areas. Best for low-stress accent placement.
Application Tools:
- Rhinestone picker or wax pencil for precise stone placement.
- Tweezers with fine tips for small stones.
- Toothpicks or dotting tools for adhesive application.
- Paintbrush for spreading glue on larger coverage areas.
- Craft tray or divided container to organize stones by size and color.
Design and Layout Tools:
- Tailors chalk or water-soluble fabric pen for marking placement.
- Ruler and flexible measuring tape for spacing guides.
- Stencil or template for repeating patterns.
- Cardboard or foam board to stretch the costume piece during application.
Workspace Setup:
- A well-lit table with a magnifying lamp if possible.
- Paper towels and rubbing alcohol for cleanup.
- Ventilation — E6000 fumes require airflow.
Step 1: Plan Your Rhinestone Dance Costume Design
Every successful rhinestone costume starts with a plan. Lay the costume flat on your work surface and study the garment construction. Note the seams, darts, and stretch direction. These structural lines guide where stones should go and where they should stop.
Mark your design with tailors chalk or a water-soluble pen. Start with the focal areas: neckline, waist, and any cutouts. These are the points where judges and audiences look first. Build outward from these anchors.
For symmetrical designs, mark the center line of the bodice first, then work left and right. Use a ruler to keep spacing consistent. A common mistake is placing stones too close to seams where the fabric stretches during movement — stones pop off when the seam pulls. Keep a 3-4 mm buffer zone around all seam lines.
Consider the performance moves. If the dancer has a backbend or a lift in the routine, avoid placing stones directly over the shoulder blades or hip points where fabric tension is highest. Adapt the design to the choreography, not just the mannequin.
Mini-Story: The Backbend Disaster
Megan, a dance mom from Ohio, learned this the hard way two weeks before her daughter Emma's regional competition. She had placed a solid row of SS20 stones along the back seam of Emma's lyrical costume.
During dress rehearsal, Emma hit her backbend and six stones popped off in sequence, scattering across the stage. Megan had to remove the entire row and reapply with a 5 mm gap between each stone.
The revised design held perfectly through competition weekend. Megan now tells every new dance mom: "Choreography comes before placement — plan around the movement, not just the pose."
Step 2: Prepare the Costume Surface
Clean the costume fabric where stones will be applied. Lycra and spandex often have residual oils from manufacturing or previous wear. Wipe the area gently with rubbing alcohol on a soft cloth and let it dry completely.
For stretch fabrics, stabilize the area you are working on. Stretch the costume over a piece of cardboard or foam board and pin or tape it in place. This prevents the fabric from pulling and distorting while you apply stones. When you release the tension, the stones settle naturally without puckering.
Test a single stone in an inconspicuous area first. Apply glue, place the stone, and let it cure for the recommended time. Then stretch the fabric gently to see how the stone behaves. If it pops off easily, you need a stronger adhesive or a different application technique.
Step 3: Apply the Adhesive
Apply adhesive sparingly. A common beginner mistake is using too much glue, which seeps up around the stone edges and dulls the sparkle. A dot the size of a pinhead is sufficient for an SS16 stone.
For E6000, squeeze a small amount onto a disposable surface (cardboard or a craft mat) and dip your toothpick or dotting tool into it. Transfer a tiny dot to the fabric where the stone will sit. Do not apply glue directly from the tube to the garment — you will have no control over the amount.
For larger coverage areas, you can apply a thin line of glue using the nozzle tip and place stones along the line. This works well for straight borders and hem accents, but it requires steady hands and quick placement before the glue skins over.
Work in small sections no larger than a 4-inch square. Adhesive dries and forms a skin within 2-5 minutes. If you spread glue over too large an area, the later stones will not bond properly.
Step 4: Place Each Rhinestone with Precision
Pick up each stone with your rhinestone picker or wax pencil. Press it gently into the adhesive dot with a slight twisting motion. This ensures the glue spreads evenly under the base of the stone without squeezing out the sides.
Keep a consistent pressure. Pressing too hard forces glue up around the stone. Pressing too lightly leaves air pockets that weaken the bond. You want the stone base fully seated in the glue with the top facets completely clean.
Check alignment as you go. Step back every few stones to view the line from a distance. It is much easier to adjust a stone in the first 10 seconds than after the glue has set.
Mini-Story: The 3 AM Realignment
Sarah, a costume designer in Dallas, was rhinestoning eight competition solos for a studio recital. At 3 AM, halfway through the fifth bodice, she realized her rows were drifting 2 mm to the left.
The mistake started eight rows earlier when she shifted her ruler without re-checking the center line. She had to remove 60 stones with tweezers and isopropyl alcohol and reapply them.
Sarah now uses a registration mark system — she draws a center spine and horizontal guide lines across the bodice every 2 inches before placing a single stone. That fix cut her realignment time to zero on the remaining three costumes.
Step 5: Let the Costume Cure Fully
Curing is the step most dance moms rush, and it is the number one reason stones fall off. E6000 and GemTac require 24 hours for a functional bond and 72 hours for full strength. Heat accelerates curing, but do not use a hair dryer or heat gun directly on the stones — thermal shock can weaken the adhesive.
Hang the costume in a well-ventilated area away from dust and pet hair. If you must transport it before full cure, lay it flat in a garment bag with tissue paper between layers so fresh stones do not touch anything.
Do not try on the costume during the cure period. Every stretch and flex breaks the microscopic adhesive bonds that are still forming. If a fitting is unavoidable, wait at least 12 hours and handle the costume as little as possible.
Step 6: Reinforce High-Stress Areas
Dance costumes endure extreme movement. A single competition routine involves jumps, turns, lifts, and floor work. Stones on necklines, armholes, waist seams, and underarm areas face the most mechanical stress.
For these zones, apply a slightly larger adhesive dot and let the stone cure for the full 72 hours. You can also add a tiny drop of E6000 around the edge of the stone after it is placed (but before cure) to create a stronger mechanical lock.
For costumes that will be worn multiple times across a season, consider stitching the largest stones in place. Use a beading needle and clear monofilament thread. Pass the needle through the stone setting hole or around the stone base and tie off on the wrong side of the fabric. This is standard practice for Broadway costumes and it works equally well for competition wear.
Caring for Rhinestoned Dance Costumes
Proper care extends the life of your rhinestone costume dramatically. Hand wash only — never machine wash a rhinestoned garment. Use cold water and a mild detergent.
Submerge and swish gently. Do not scrub the stones.
Lay the costume flat to dry on a towel. Do not wring or twist. Do not put it in the dryer. Heat loosens adhesive and can cause stones to fall off.
Store the costume flat or rolled in a garment bag. Hanging heavy rhinestoned costumes stretches the fabric over time, which puts tension on the stone bonds.
After each performance, inspect the costume. Replace any loose or missing stones immediately. A single missing stone in a visible spot draws the judge's eye away from the performance.
CTA: Get Your Rhinestone Design Planned Before You Buy
Before ordering hundreds of stones, sketch your design on paper and calculate exact quantities. Download our free rhinestone costume design template [link] to map your layout, estimate stone counts, and avoid costly over-ordering.
Frequently Asked Questions
What is the best glue for rhinestones on dance costumes?
E6000 is the most trusted adhesive for dance costumes because it remains flexible after curing and bonds strongly to fabric. GemTac is a close alternative that dries clearer and performs better through repeated washing. Both require 24-72 hours of full cure time.
How long after rhinestoning can a costume be worn?
Wait at least 24 hours before trying on the costume and 72 hours before full performance wear. The adhesive continues to cure and strengthen during this window. Wearing the costume early is the most common cause of stone loss.
Can you put rhinestones on any fabric?
Most dance costume fabrics accept rhinestones well, including lycra, spandex, chiffon, velvet, and mesh. Very slippery fabrics like charmeuse and certain satins require extra care and surface preparation. Avoid applying stones to loosely knit or extremely stretchy mesh without stabilizing the area first.
How do you remove rhinestones from a dance costume?
Apply isopropyl alcohol or adhesive remover around the stone edge with a cotton swab. Let it soak for 30-60 seconds, then gently pry the stone off with tweezers. Clean any residual glue from the fabric before reapplying. Do not pull — this can tear the fabric.
Are hotfix rhinestones good enough for dance costumes?
Hotfix stones work for low-stress accent areas like scattered bodice decoration or hairpieces. They are not recommended for high-motion areas, dense coverage, or costumes that will be worn multiple times. The heat-bonded adhesive is weaker than E6000 or GemTac and degrades faster with washing.
How many rhinestones does a dance costume need?
A child-size competition bodice with medium coverage needs 400-600 SS16 stones. Adult full-coverage costumes require 800-1,200 stones. Always buy 10-15% extra to account for replacements and design adjustments.
CTA: Need a Second Opinion on Your Costume Design?
Not sure if your layout will survive competition season? Send us a photo of your marked-up costume and we will give you feedback on stone placement, adhesive choices, and reinforcement strategy. Our team has worked with over 200 competition studios nationwide. Contact us at [email/contact link] for a free design review.
Ready to buy wholesale rhinestones? LRISY offers factory-direct pricing on wholesale bulk rhinestones with fast international shipping. Browse our flat back, pointed back, hotfix, and colors AB collections for all your needs.

Leave a comment
All comments are moderated before being published.
This site is protected by hCaptcha and the hCaptcha Privacy Policy and Terms of Service apply.